PROFESSIONAL PARAMOTOR Glider Inspection, TRIM, RepairS, & REPLACEMENT LINES
Precision, Transparency. Confidence in every flight
MIDWEST BASED, NATIONALLY TRUSTED
Leading Edge PPG provides professional paramotor glider inspection and repair services for pilots across the country and beyond because our approach is structured, transparent, and detail-driven.
We intentionally limit the number of wings in the shop at one time for inspection so we can ensure consistent turnaround times, minimize equipment downtime, and address repairs pulling gliders out of service as quickly as possible.
This is not a high-volume shop, it is a precision-focused service environment.
We service all brands. In rare cases where manufacturer clarification is required, we will contact the manufacturer directly to ensure accuracy and communicate clearly if additional time is needed.
Comprehensive Glider Services

Understanding Your Glider Inspection Options
Each inspection focuses on a different aspect of wing health.
• Airworthiness Inspection – This is a typical full glider inspection.
• Performance & Geometry Inspection – Full inspection with precision line measurements to correct wing geometry.
• Trim Inspection – Address performance issues caused by out of trim lines between inspections.
• Repairs – Addresses damaged fabric, worn lines, and other structural issues between inspections.
Not sure which service your glider needs?
Reach out and we’ll help you determine the ideal service for your glider.
AIRWORTHINESS Inspection — $230
A full-system evaluation of your glider’s fabric, lines, risers, and internal structure. Ideal for pilots who want a technical assessment of airworthiness and long-term performance or are preparing for the sale of their glider.
Turnaround Time:
Recommended Interval:
Each manufacturer recommendation may vary. A first full inspection should be completed once the glider is 3 years old or reaches 60 hours of loaded flight time, whichever happens first. After the first inspection, additional inspections should generally be completed every 2 years or 50 hours unless a service shop recommends a shorter interval.
Includes:
- Multi-point fabric porosity check
- Fabric tear resistance measurement
- Internal & external fabric inspection
- Seam and stitching evaluation
- Debris clearing from cells
- Riser inspection
- Line inspection
- Basic repairs included (minor stitching or small fabric fixes)
- Brake line replacement for gliders 2+ years old
- Breaking strength test (highest-loaded original lines measured to nearest 0.1 kg, 2-4 line segments on most gliders)
- Replacement of damaged lines ($30/line)
- Repairs as needed (repairs completed following confirmation with glider owner)
- Comprehensive written inspection report
Note: All inspections begin with porosity testing. If porosity test fails, inspection stops immediately and the inspection charge is reduced to $60 plus return shipping. This ensures pilots are not committed to unnecessary inspection costs on a wing that is no longer airworthy.
Repairs:
- $30/line for any damaged lines replaced
- $80/hr plus materials for fabric and riser repairs
Best For:
- Routine maintenance
- Structural evaluation
- Pre-sale or post-purchase of a used glider
PERFORMANCE & GEOMETRY INSPECTION — $475
Accurate laser-based line measurement and trim analysis to restore factory geometry and improve performance, handling, and safety.
Turnaround Time:
2-3 weeks from scheduled inspection date.
Recommended Interval:
Gliders that have reached 80-100 hours of loaded flying time are recommended to have line measurements and trim tuning. All lines have various capacity for stretch and shrinkage. After 80-100 hours, most lines will have reached their stretch/shrink potential and should be measured to correct line length variances.
Gliders that have had multiple line replacements are susceptible to asymmetric line lengths and would benefit from line measurements and trim corrections.
“The only way to know that a glider does not need line measurements is to measure the lines.”
-Elisabeth Guerin, ParaTour
Includes:
- All items from Airworthiness Inspection above
- Precision laser line measurements
- Precise adjustments to restore correct trim
- Second measurements to confirm final alignment
- Before and after measurements included in comprehensive report
In some cases, symmetry corrections may require certain lines to be replaced to bring glider back into acceptable symmetry and adherence with original manufacturer’s specifications. Lines are replaced if necessary at $30/line.
Bonus: If no trim adjustments are needed, you receive a $50 discount.
Best For:
- Gliders with 80-100+ hours that have not had previous adjustments
- High performance gliders
- Gliders that have had multiple individual line replacements
- Gliders exhibiting more difficult inflations, unexplained turning, lopsided surging, inconsistent brake pressure
- Gliders performing not as expected
TRIM TUNING — $250
Trim assessment for gliders in between inspections.
Turnaround Time:
2-3 weeks
Recommended Interval:
As needed.
Includes:
- Precision laser line measurements
- Precise adjustments to restore correct trim
- Second measurements to confirm final alignment
- Before and after measurements included in comprehensive report
If your glider is inflating poorly, has an unexplained turning tendency, or is not performing as expected, it could be out of trim. All lines have capacity to stretch or shrink. Each glider line carries a different amount of load and over time, line length can change from original manufacturer specifications.
Gliders that have had multiple line replacements or are over 80-100 hours of loaded flight time could benefit from a trim assessment.
Bonus: If no trim adjustments are needed, you receive a $50 discount.
Best For:
REPAIRS — $80/hour + materials
Repairs for gliders in between inspections.
Turnaround Time:
Repair timelines vary depending on the scope and parts availability. Most repairs have multiple repair options with differing cost and timeframes associated. Repair options will be discussed before repairs begin.
Recommended Interval:
As needed.
Includes:
- Internal & external fabric inspection
- Seam and stitching evaluation
- Riser inspection
- Line inspection
- Comprehensive written inspection report
- Damaged lines replaced at $30/line
- Fabric, stitching, and riser repairs completed at $80/hour plus materials
This ensures that no damage is left unaddressed. When damage happens, it can impact surrounding fabric and lines. We meticulously ensure your equipment is returned in condition to trust the area that was previously damaged and continue enjoying flying safely for the long term.
Repair services May be Combined with:
- In conjunction with an Airworthiness Inspection
- In conjunction with a Performance & Geometry Inspection
- In conjunction with a Trim Assessment
- As a standalone repair
Best For:
Line Replacement Services
Individual Line Replacements — $30/line
Perfect for pilots who want quick replacements without sending the glider in. Lines are manufactured based on manufacturer’s specifications or your provided details and shipped directly to you.

In-Shop Line Replacements — $100 + $30/line
Bring your glider to the shop and have your damaged lines replaced while you wait (line inspection typically takes around an hour plus manufacturing of the necessary lines). Includes a complete line inspection to identify and replace every damaged line. Not available for drop-in, this service must be pre-coordinated and scheduled.
What to Expect
1. Submit Service Request
Provide manufacturer, model, size, approximate hours, and requested services.
2. Schedule Confirmation
Shipping instructions are provided after scheduling confirmation. Please DO NOT SHIP GLIDERS without schedule confirmation.
3. Glider Shipped
Ship gliders to the shop. You will be notified upon the glider’s safe arrival.
4. Porosity Testing
For all inspections, porosity is evaluated first to verify continued longevity of glider. Inspection continues if porosity testing is passed.
5. Inspection & Communication
Inspection & repairs are completed with pilot interests in mind. At every point where cost may increase, clear communication with pilot owner is done to ensure clear expectations, safe equipment return, and elimination of unexpected costs.
6. Report & Return
Upon completion, you receive:
- Complete inspection report
- Link to pay invoice online
- Return tracking information
Gliders ship immediately after payment is received.
Turnaround Time:
-2-3 weeks for inspection services including Airworthiness or Performance & Geometry Inspections.
-Repairs assessed on a case-by-case basis.
-Individual line replacements with Rapid Lines made and shipped in one day.
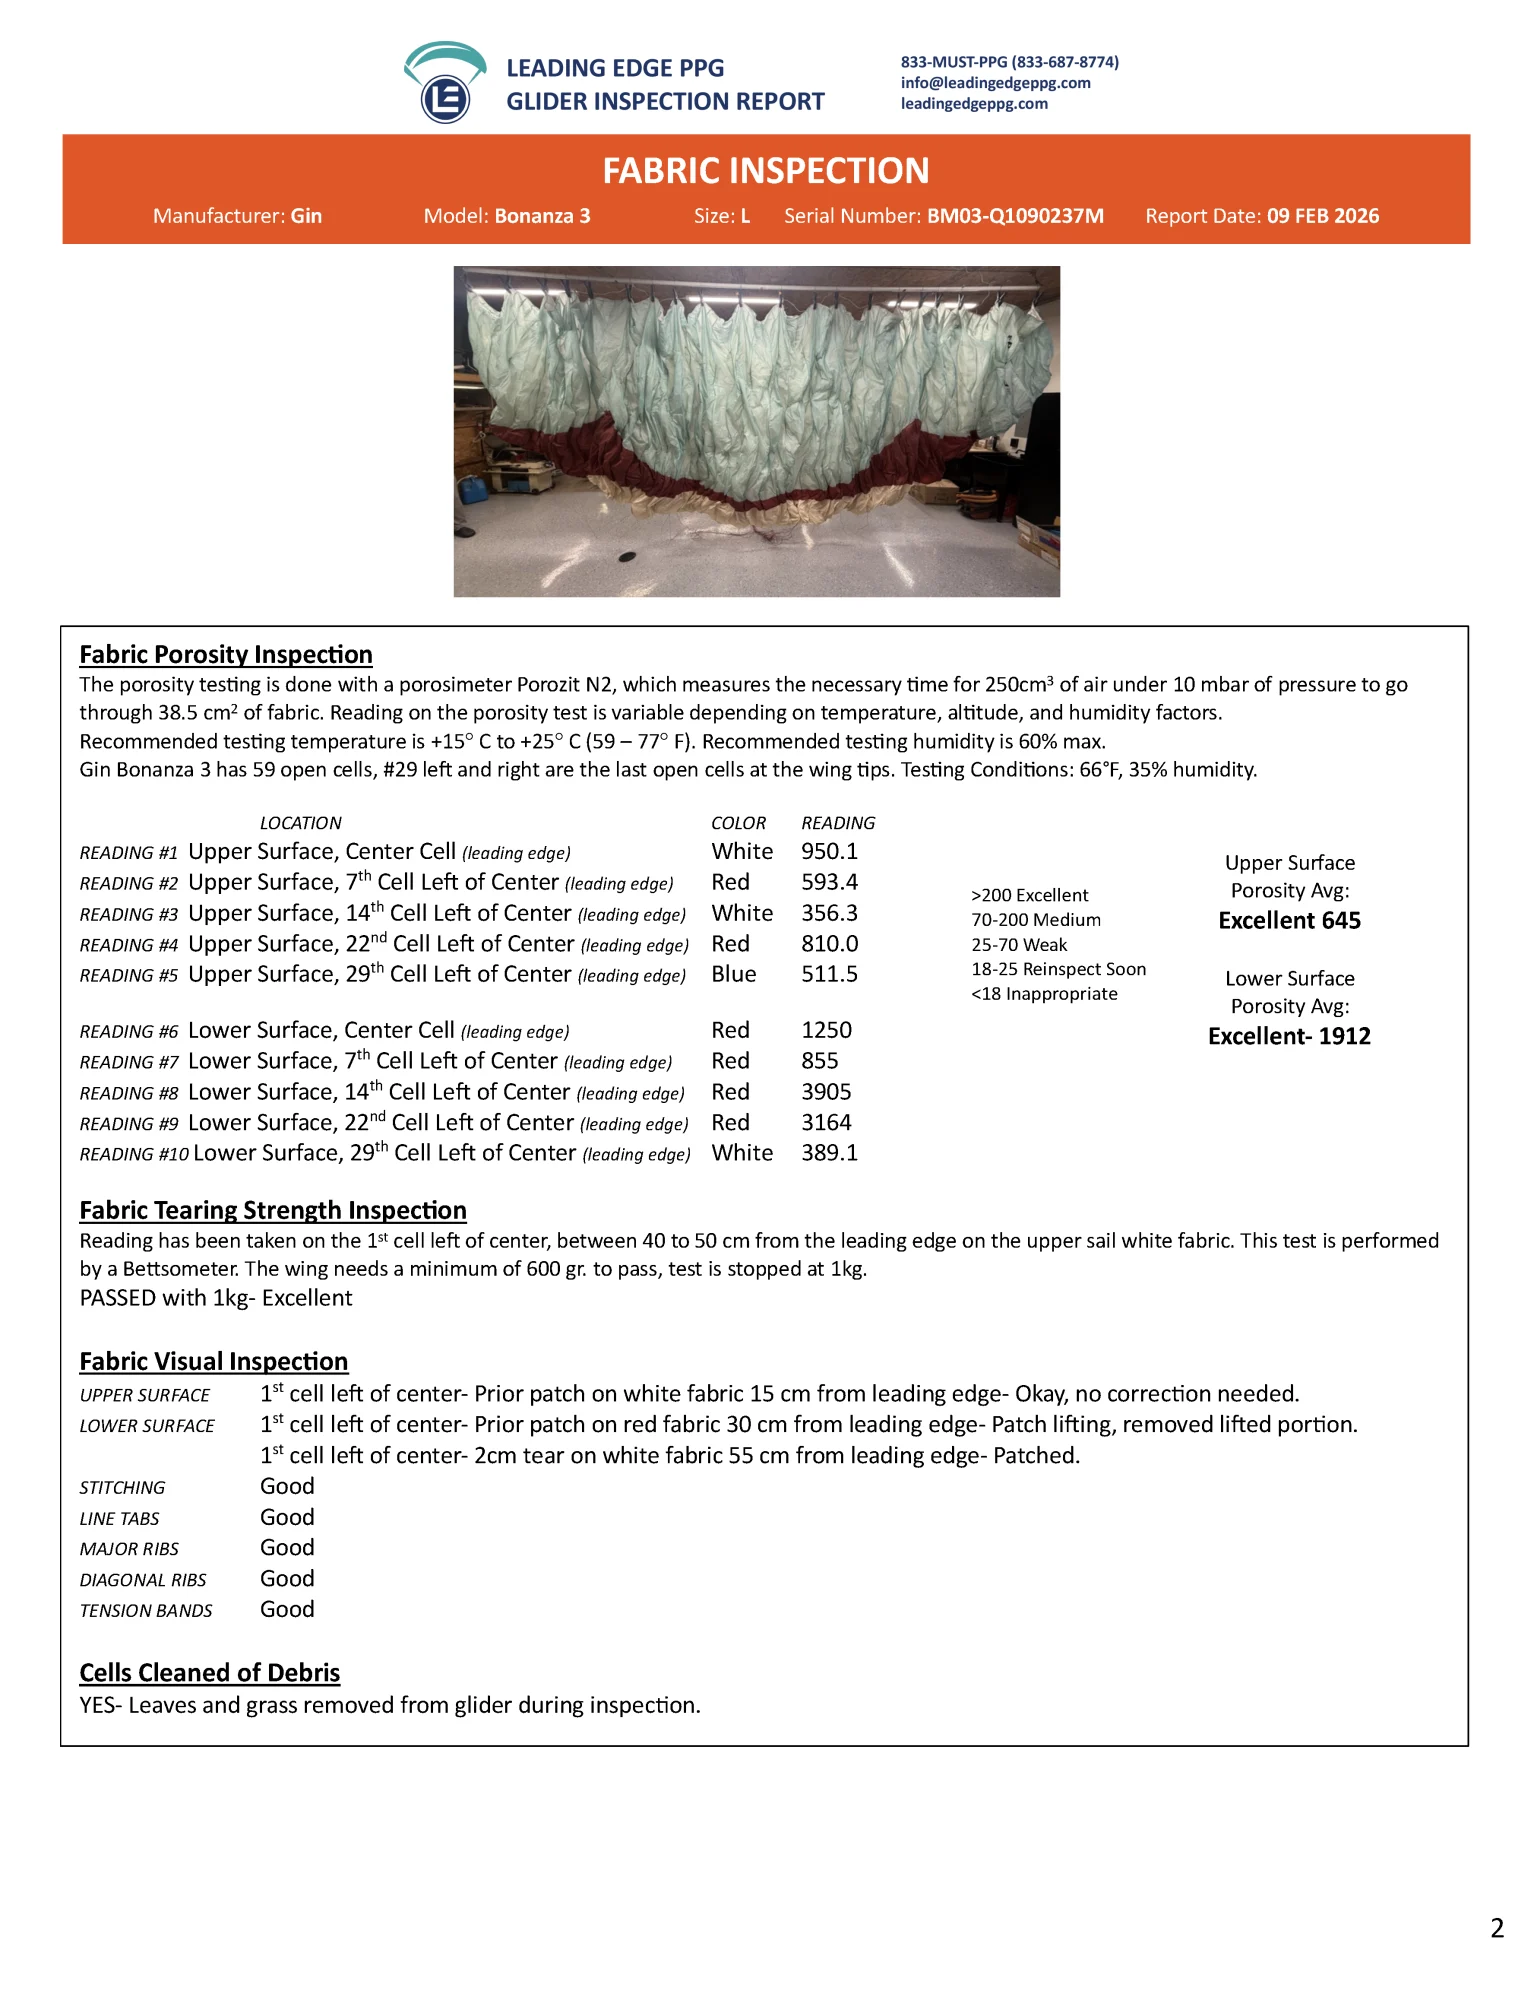
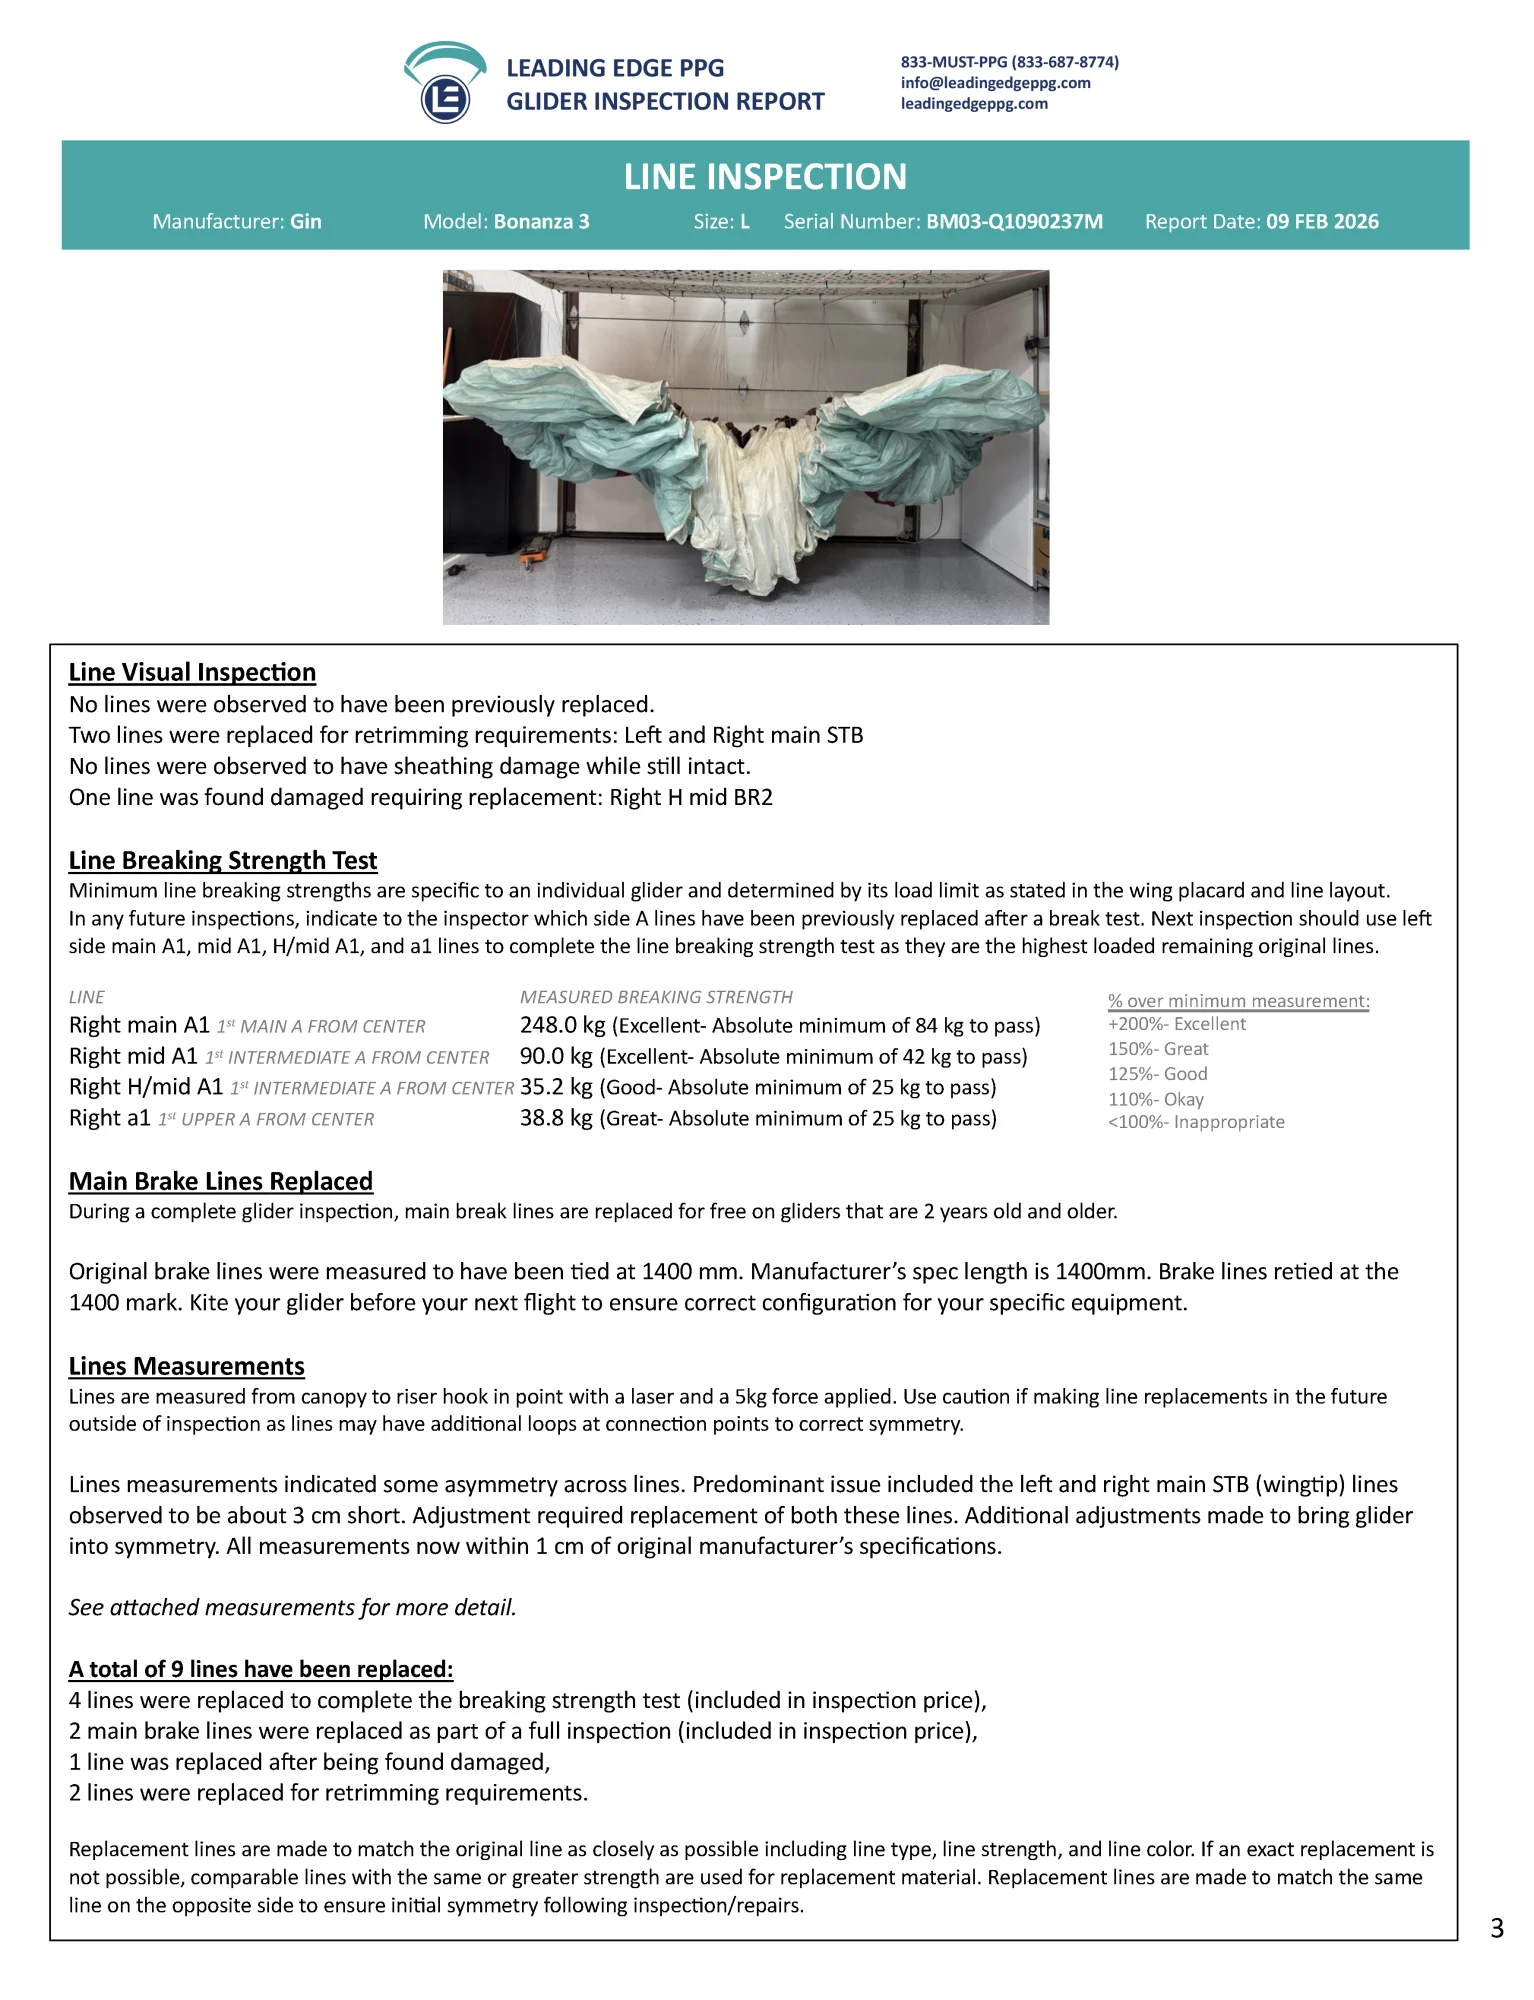
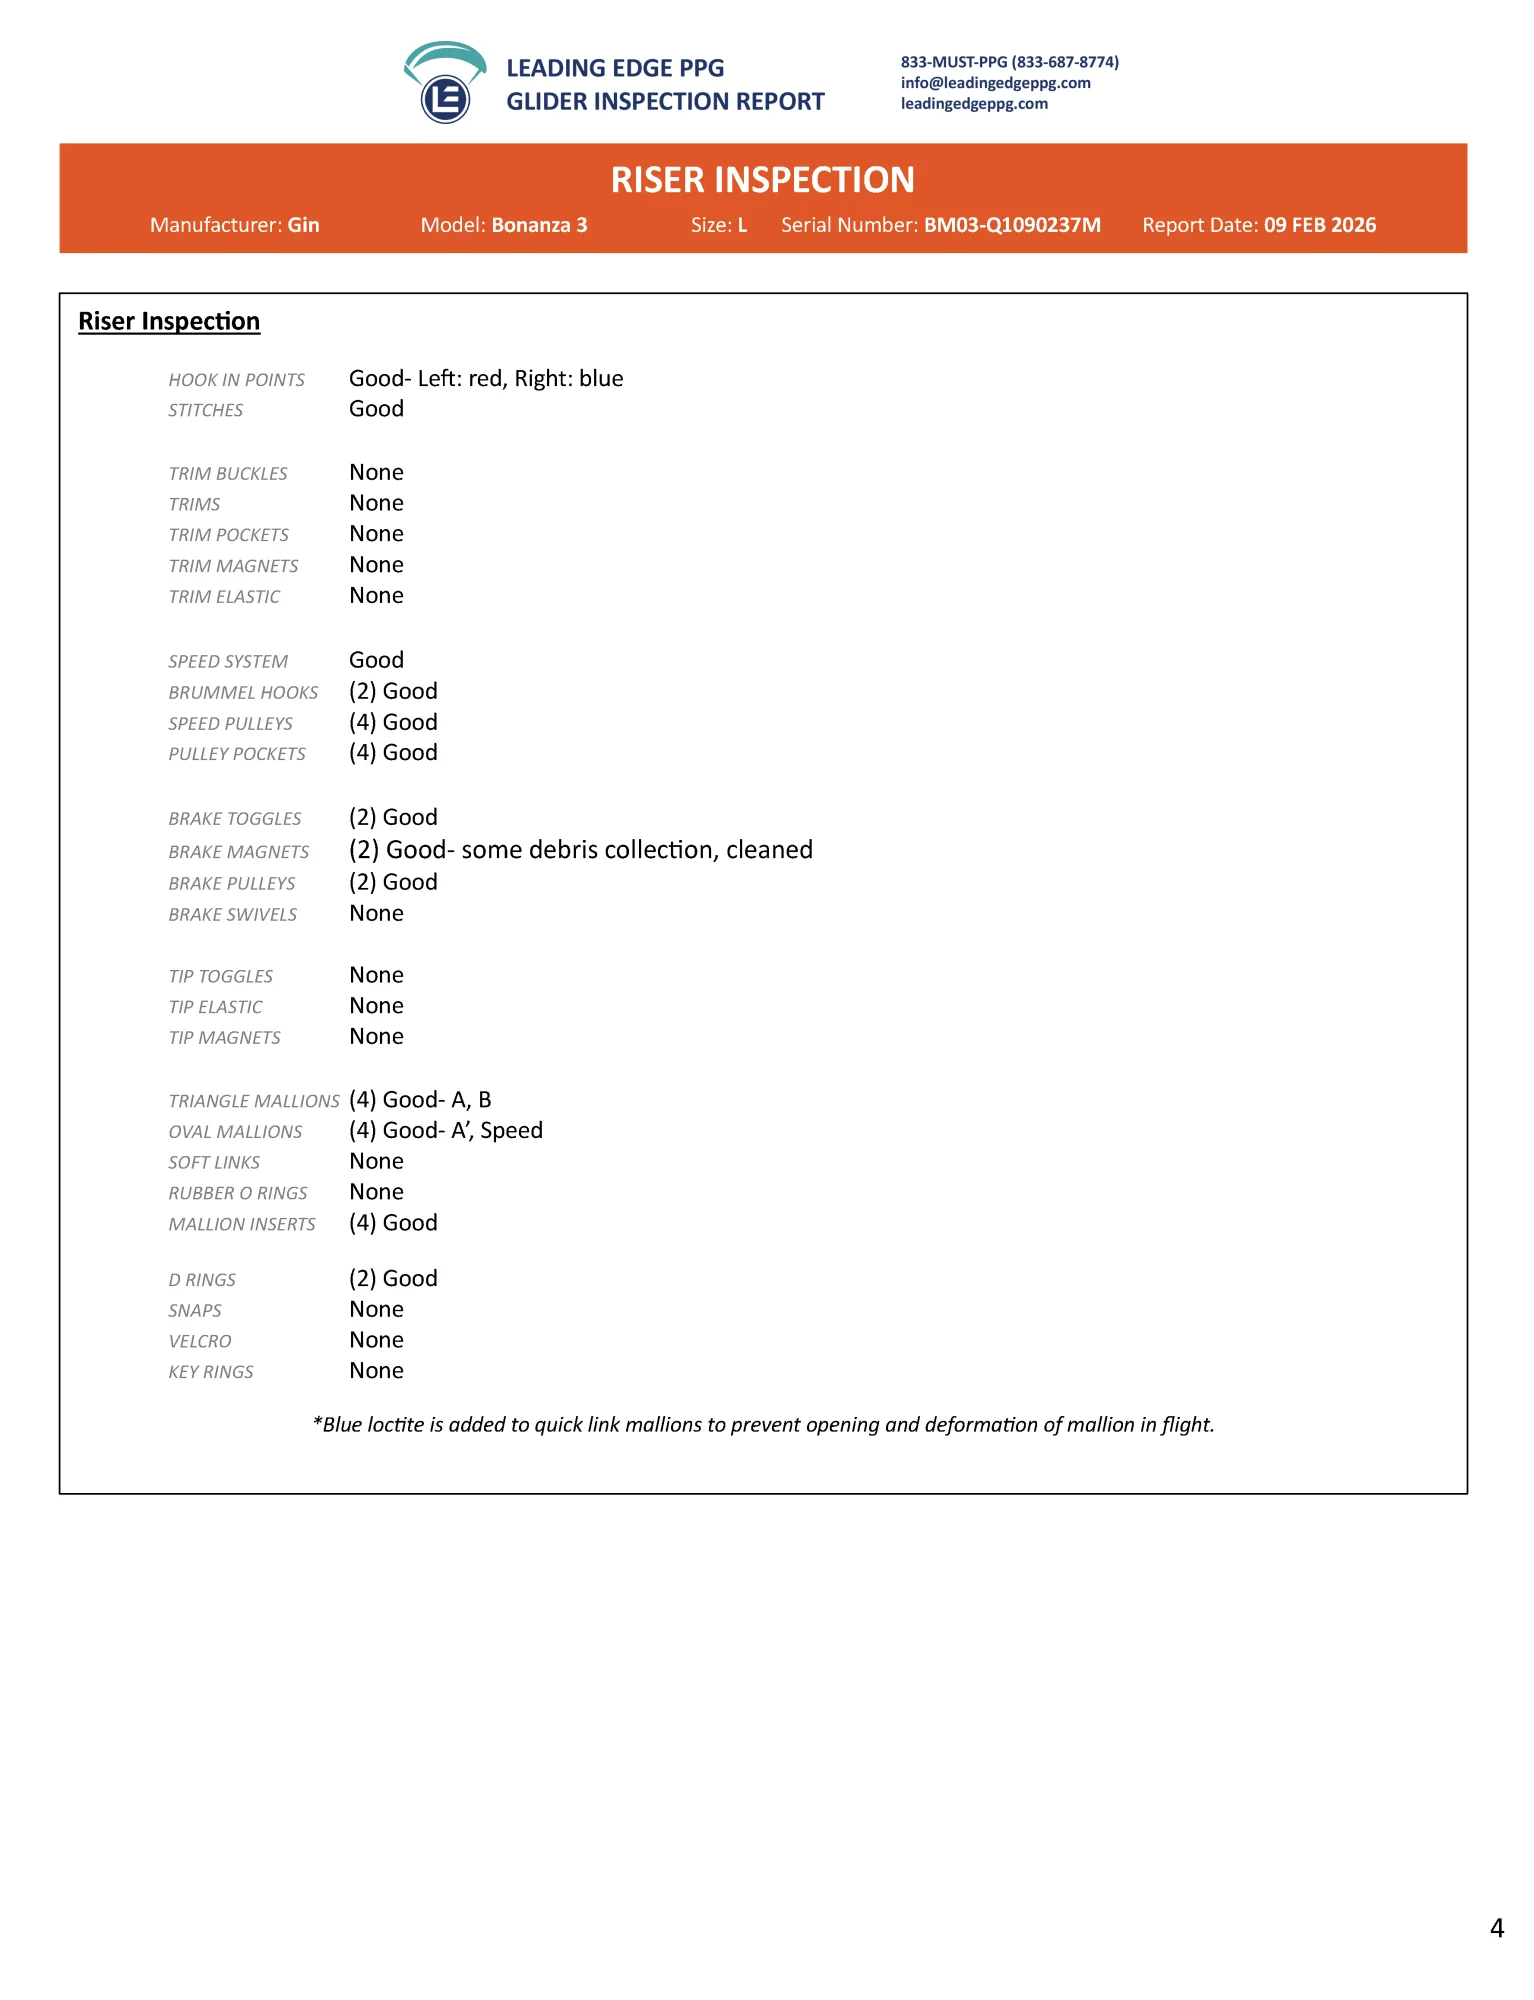
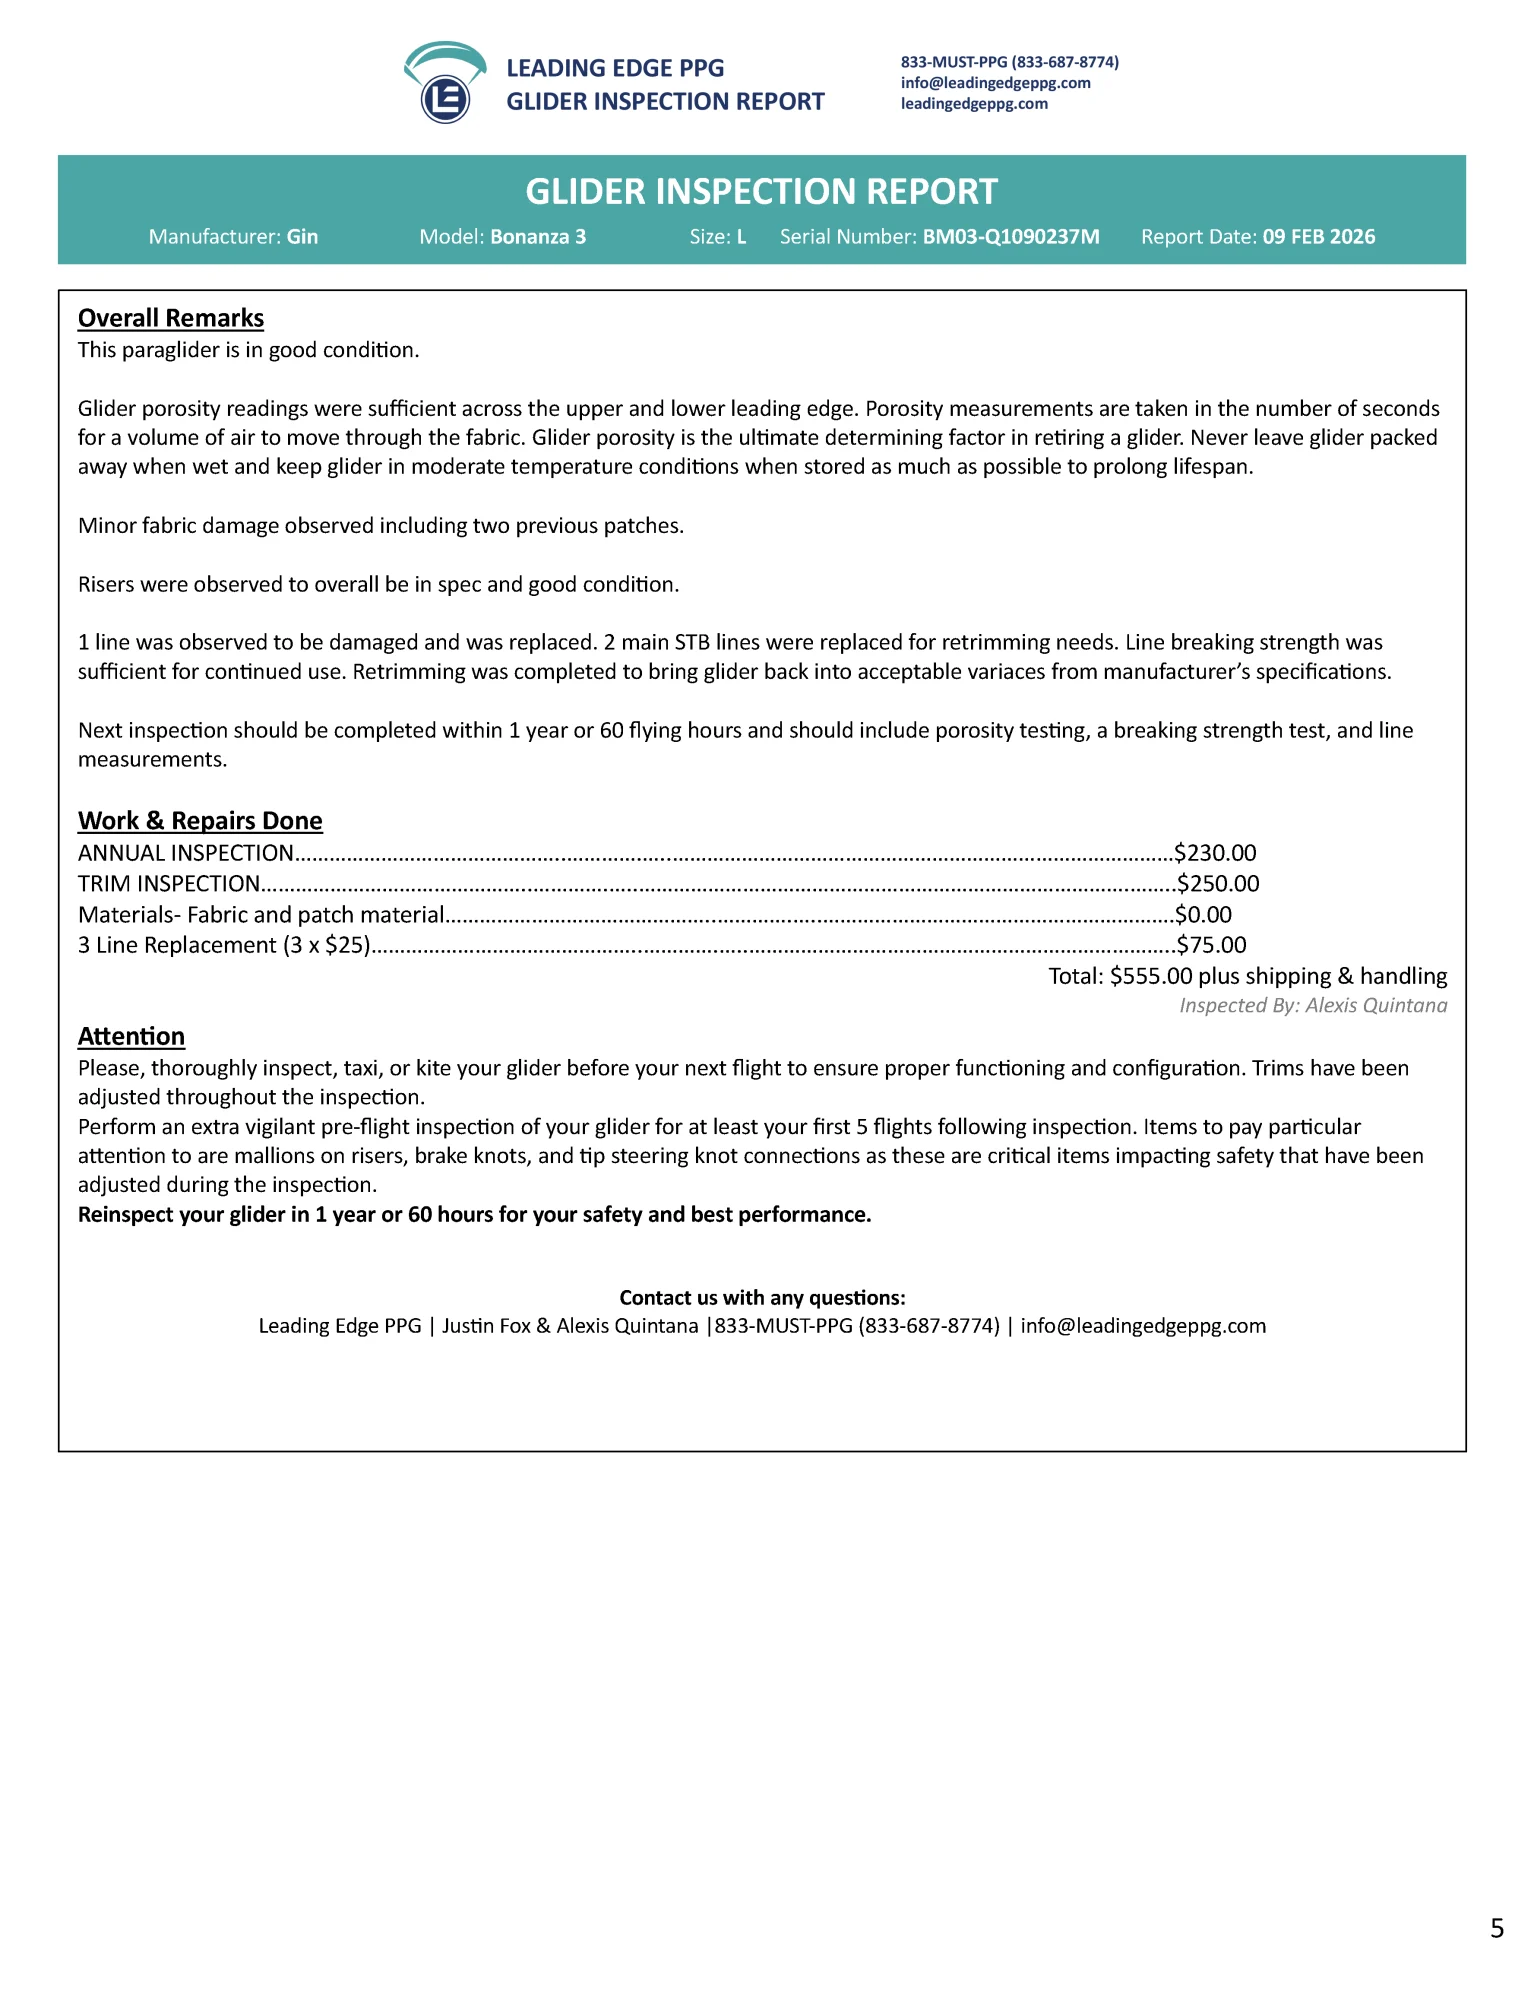
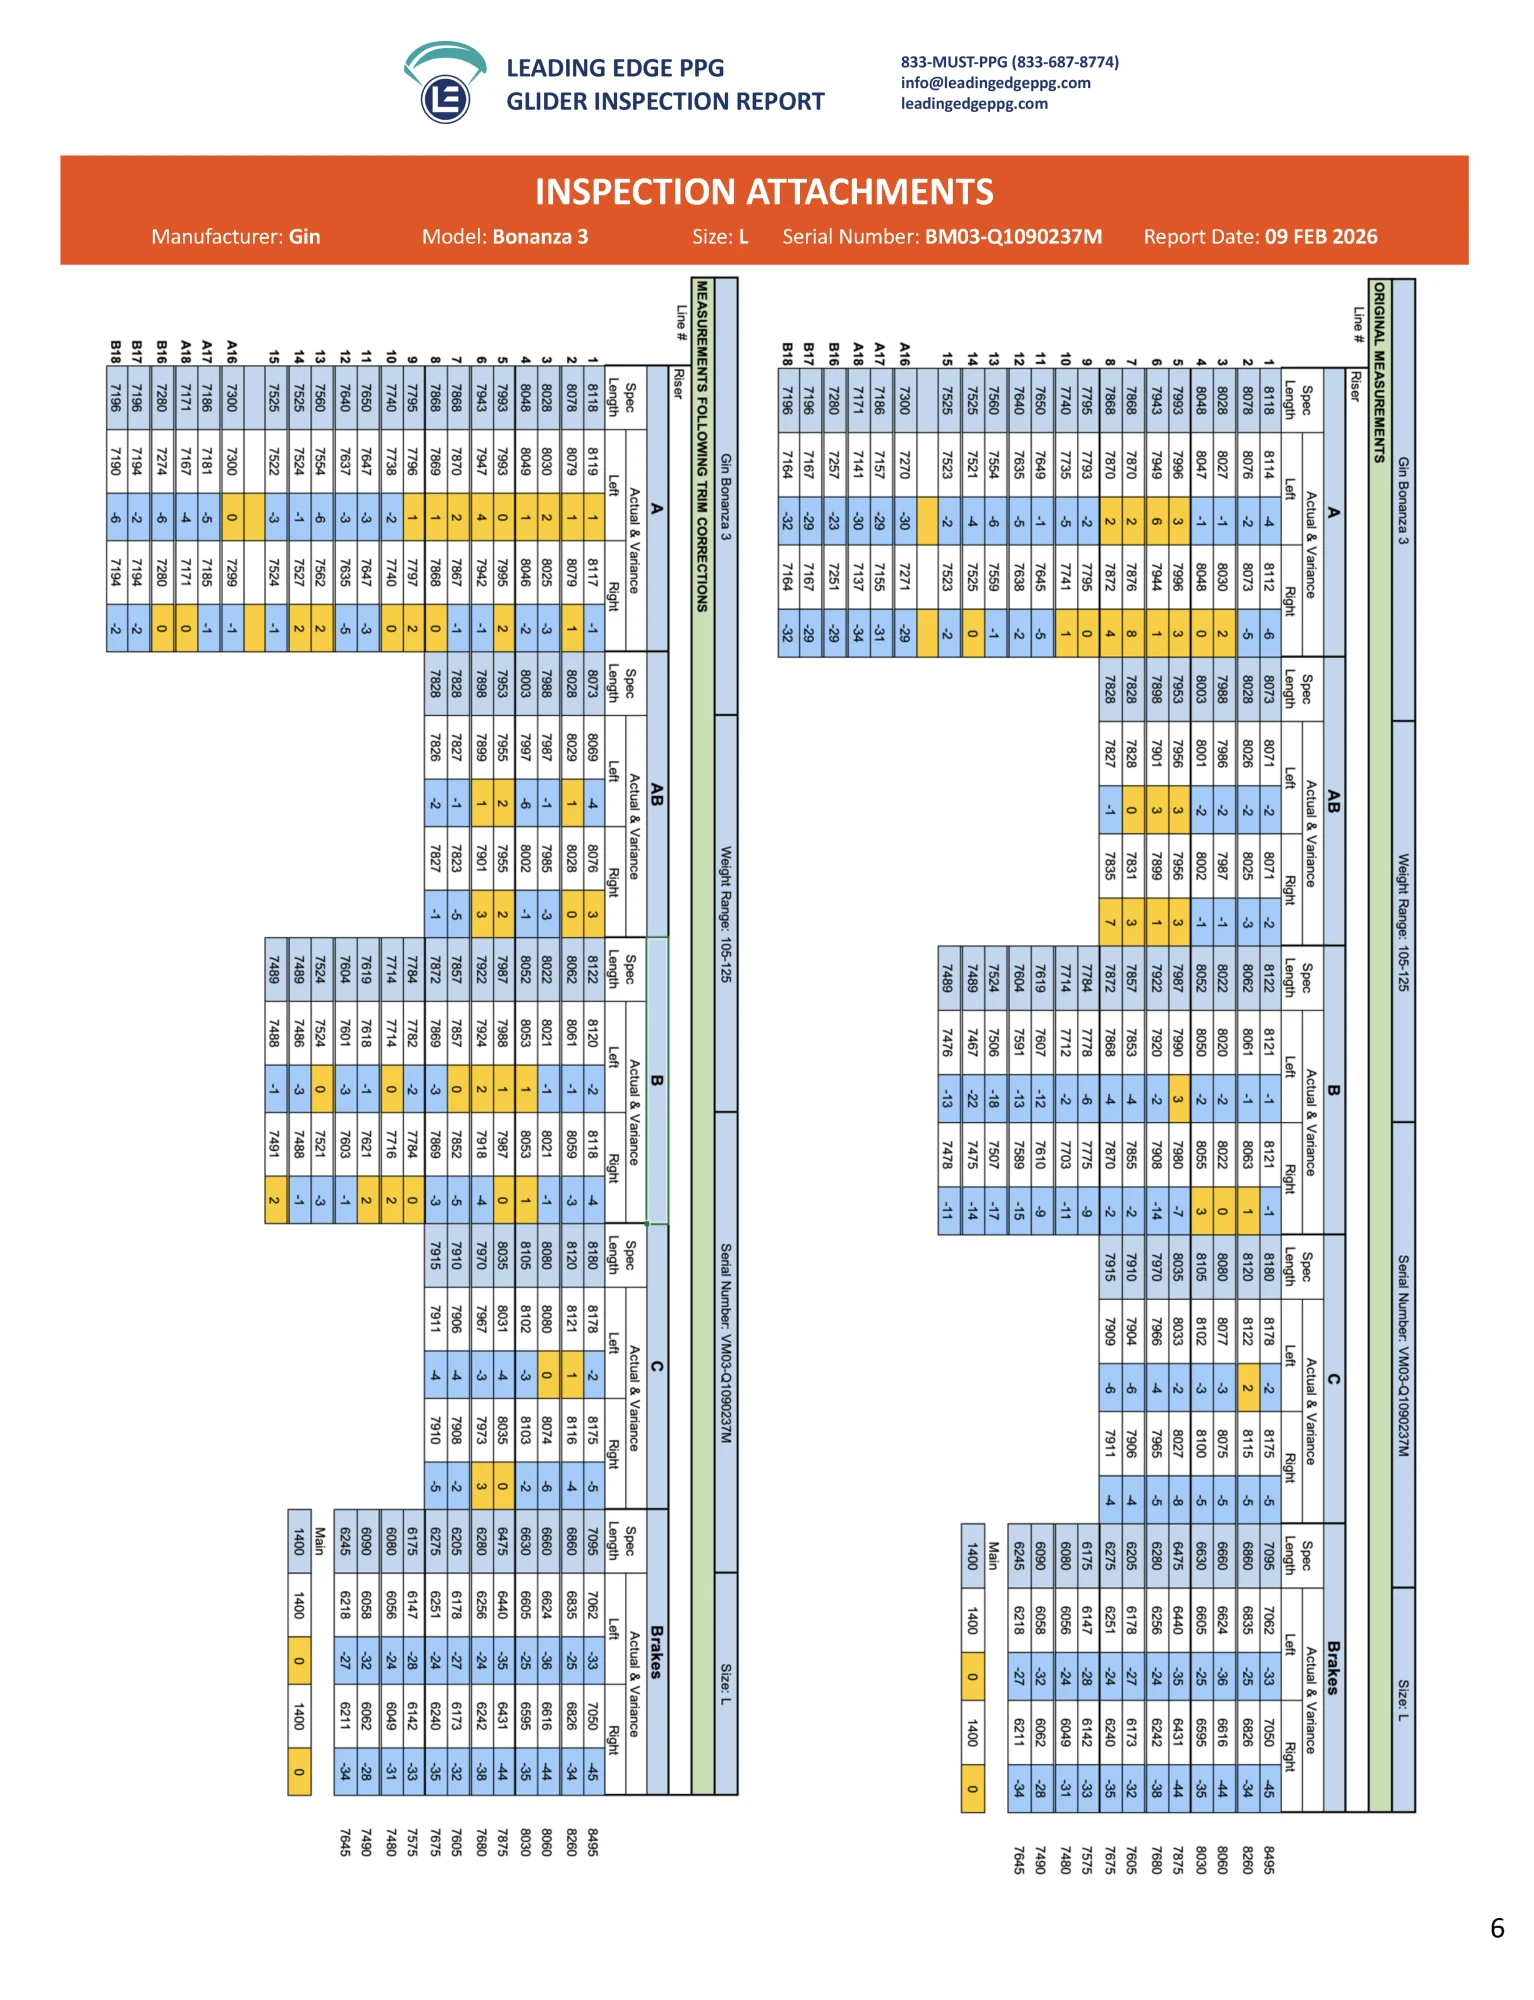
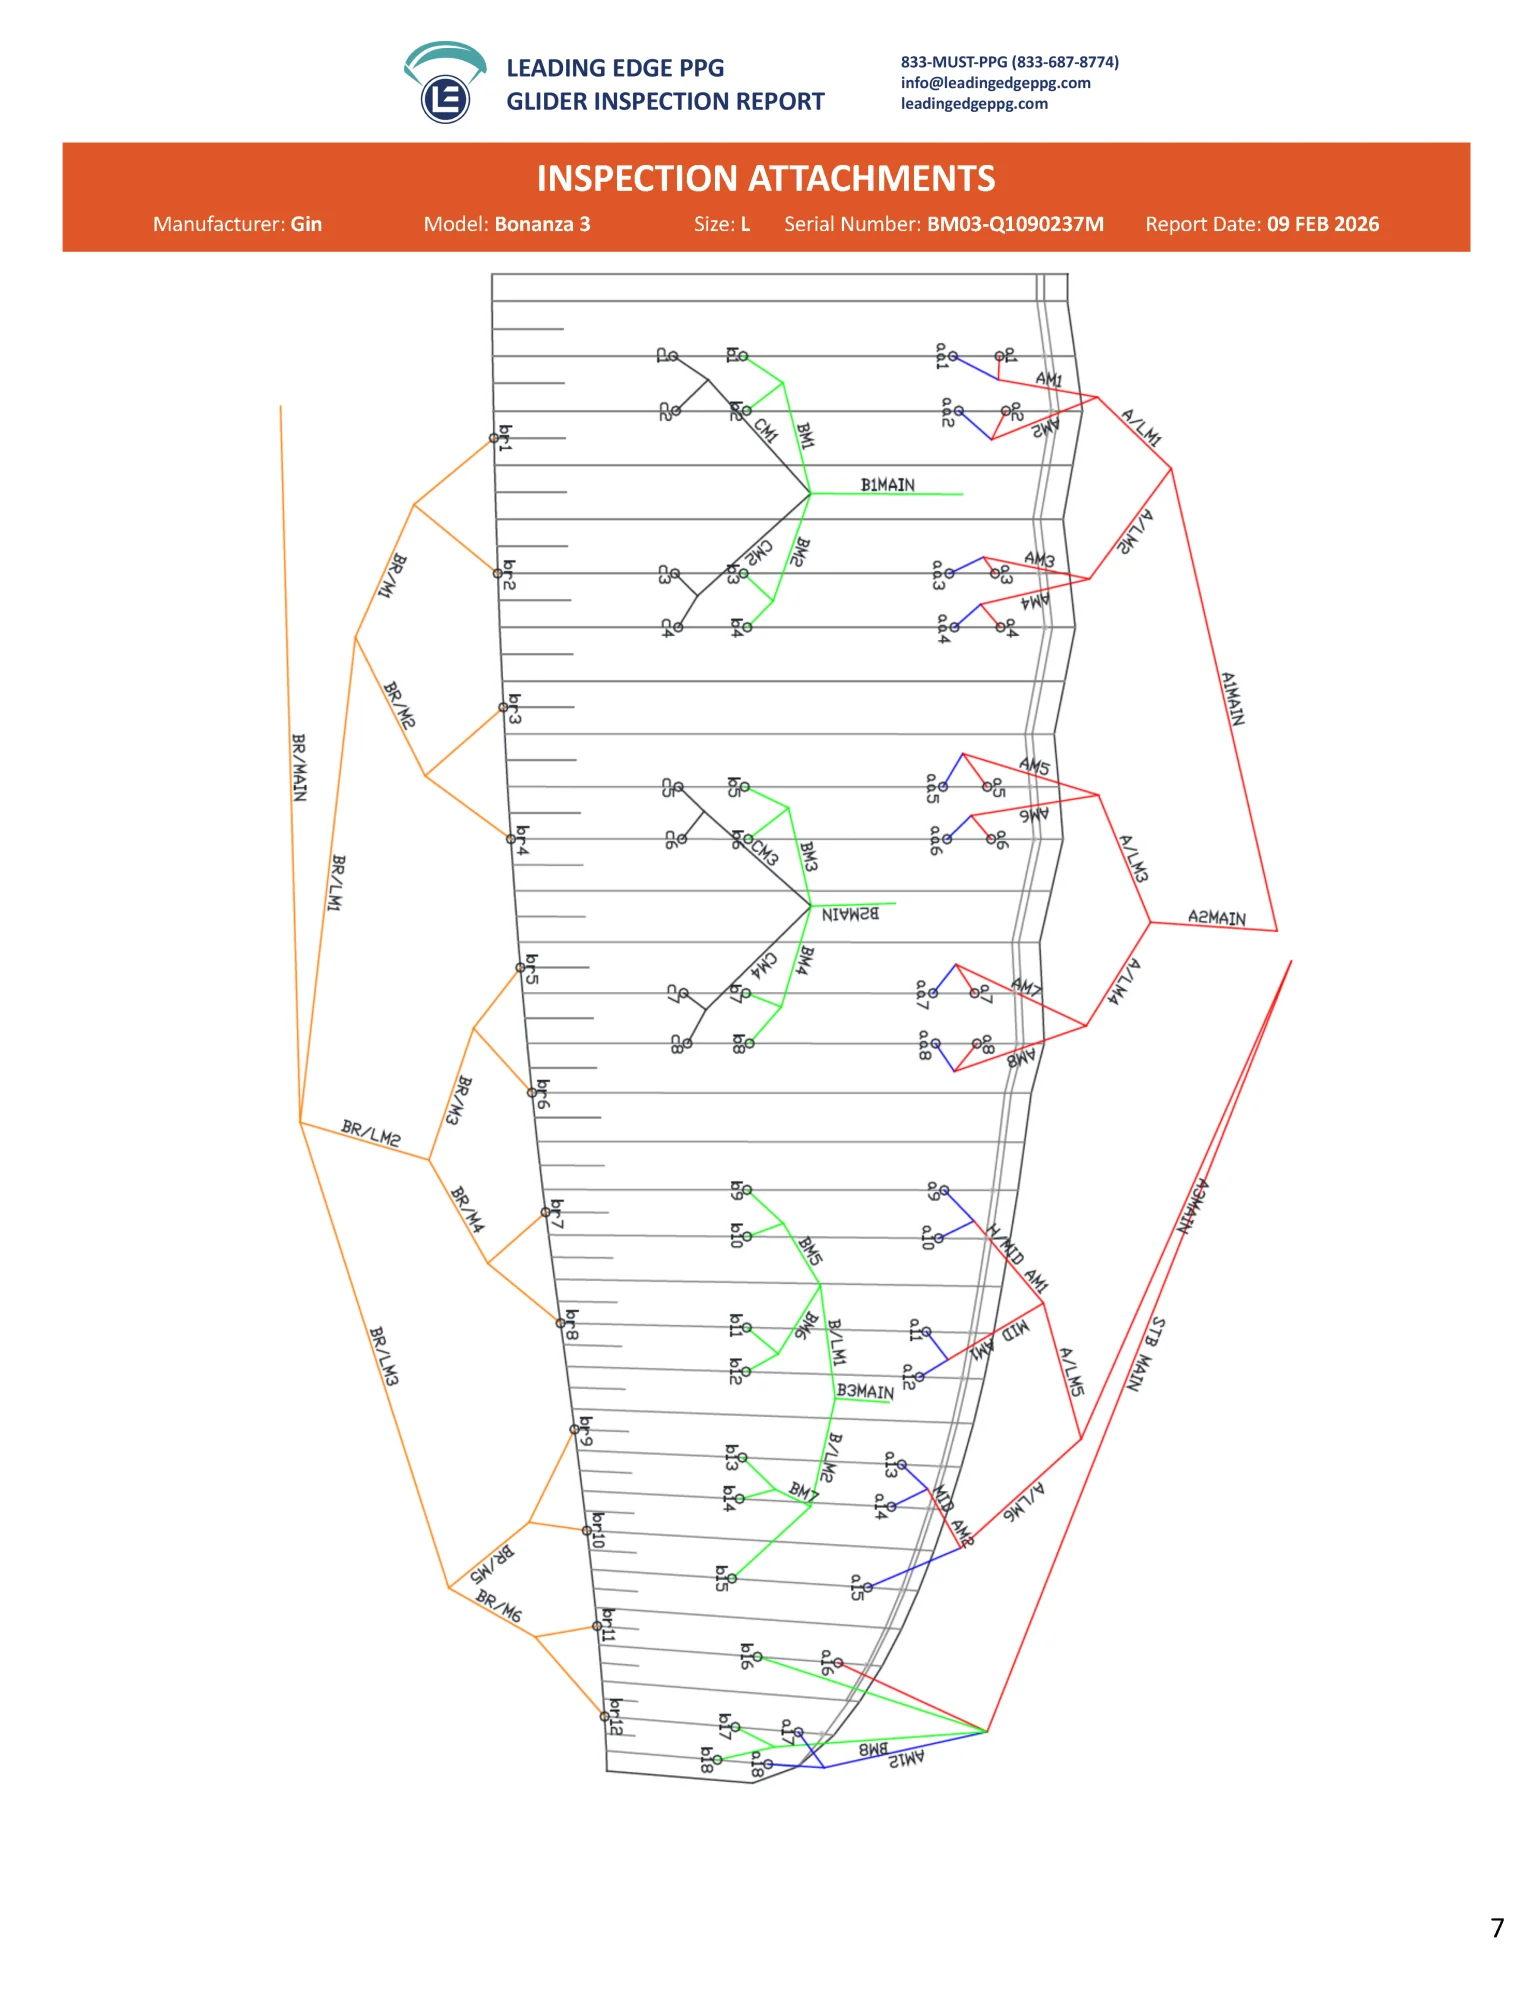
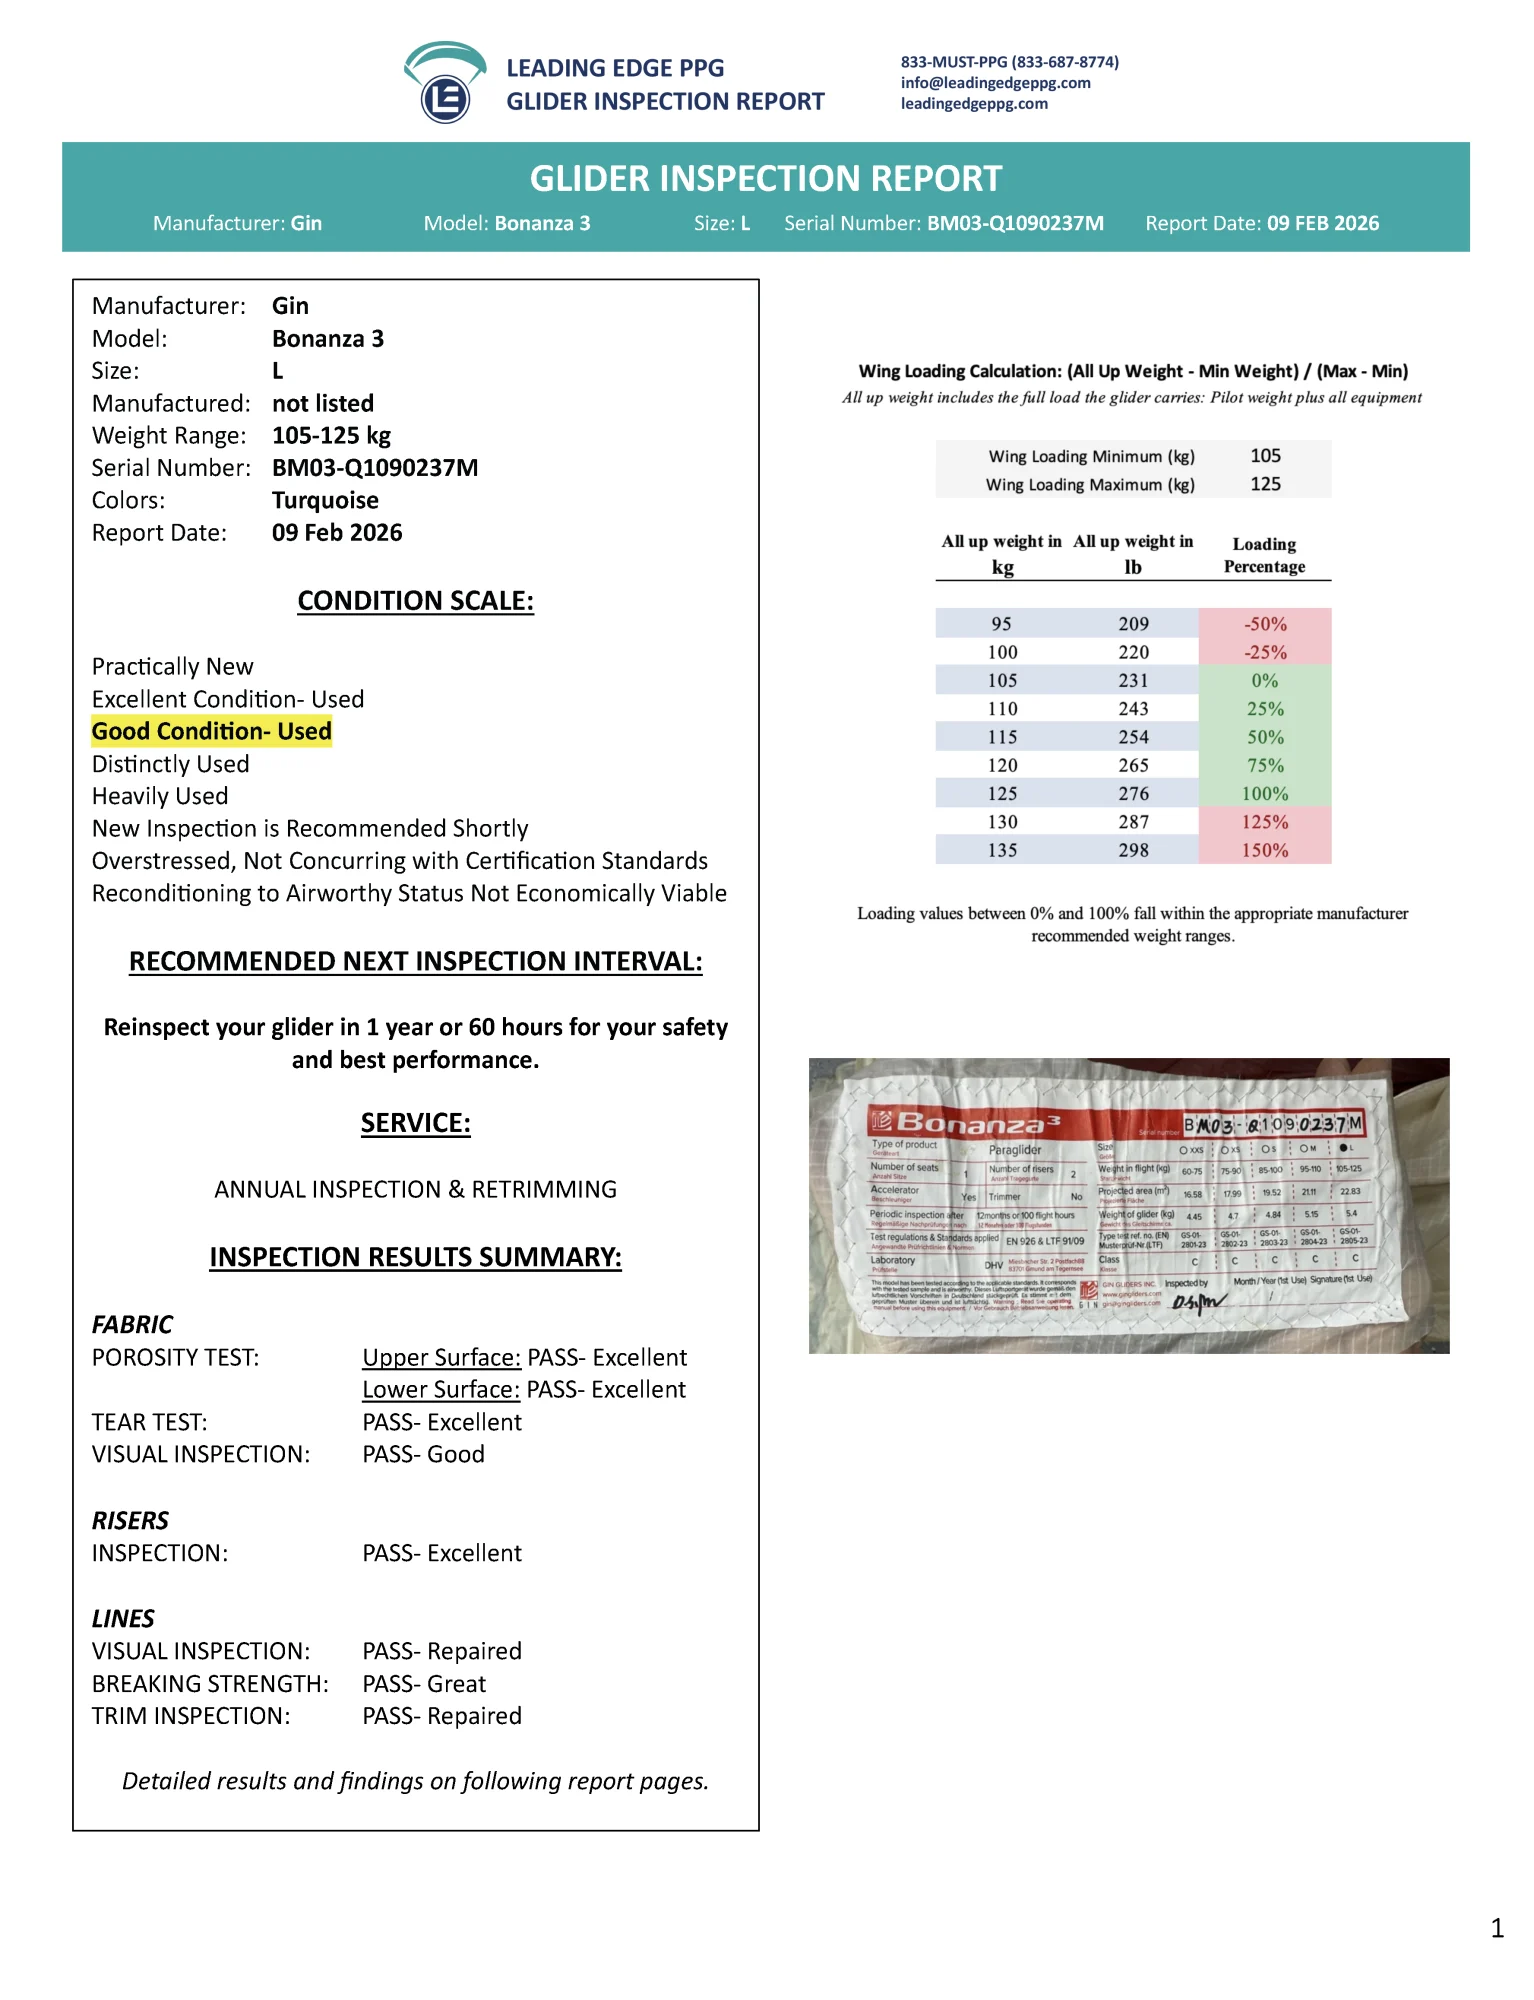
SAMPLE INSPECTION REPORT
Every inspection includes a detailed written report outlining findings, condition assessment, and recommendation for next service interval as applicable.
The attached report is a sample of a glider that had a full Performance & Geometry Inspection completed in February 2026.
We pride ourselves on providing the most comprehensive details of your glider condition and what was serviced on each glider while in our care. This detailed 7 page report is indicative of a typical level of clarity that is delivered following every inspection.
Serving Pilots Nationwide
Based in Michigan.
Trusted across the Midwest.
Serving pilots across the United States and internationally.
What people are Saying
⭐️⭐️⭐️⭐️⭐️
“Alexis provides a superb service. I sent my glider for inspection and trimming. The timing was exactly as described. The price was very competitive and the report was very detailed and exhaustive. I feel confident to fly again in this glider after the service leading edge PPG provided. Thanks.”
— Roland Sanguino
⭐️⭐️⭐️⭐️⭐️
"I sent my Ozone Roadster wing to Leading Edge for an inspection. They communicated every step of the way and completed the work on time with their estimates. If you need a wing inspection, I highly recommend them."
— Brian Horton
⭐️⭐️⭐️⭐️⭐️
"Fast and friendly service from industry experts. Alexis communicated every step of the way and sent progress photos and a detailed findings report. The repaired wing was shipped back in time for my next event."
— “Gator Chris”
⭐️⭐️⭐️⭐️⭐️
"Leading Edge PPG is a fantastic Paramotor school! I trained with Justin in 2019 & continue to give them my business today! Their glider inspection reports are the best in the industry! You guys rock!"
— Jeremy Howe
What HAPPENS IF A GLIDER FAILS INSPECTION
Most wings that come through the shop pass inspection without issue. However, inspections exist to identify when equipment has reached the limits of safe use or when maintenance is required to keep it airworthy.
A glider may fail inspection in one of three primary ways.
FABRIC POROSITY FAILURE (Glider Retirement)
The fabric condition of the wing ultimately determines its lifespan.
During inspection, multiple locations on the glider are tested to evaluate how well the fabric can maintain internal pressure. If the fabric becomes too porous, the wing may become difficult to inflate, more prone to collapses or stalls, and more vulnerable to structural tearing when under load.
Because the integrity of the fabric determines the overall safety of the wing, porosity testing is always the first step performed during inspection.
If the fabric no longer maintains adequate pressure, the glider must be retired from flight, regardless of the condition of the lines or other components.
Unfortunately, gliders that have failed a porosity inspection are NOT good for use as "just a kiting glider." The altered characteristics build poor habits in pilots looking to practice.
LINE STRENGTH FAILURE (Replacement Line Set)
Paraglider lines gradually lose strength over time due to normal use, environmental exposure, and repeated loading during flight.
Each line on a glider is designed to meet a minimum strength requirement to safely support the loads the wing is certified for. If a line fails the breaking strength test, the glider may still remain airworthy provided the fabric is in good condition.
In these cases, installing a complete replacement line set can restore the glider’s structural safety.
Replacement line sets vary in price depending on the manufacturer and typically require several hours of professional installation in the shop. For many pilots, this can be a practical way to extend the service life of a glider without replacing the entire wing.
GLIDER DAMAGE (Repair Evaluation)
Damage does not automatically mean a glider is beyond repair.
Many types of damage—including propeller strikes, tree snags, fabric tears, seam wear, and damaged lines—can often be repaired professionally.
When a damaged glider arrives at the shop, it is first inspected to determine the scope of repair. Pilots are then provided with an honest assessment of the damage, the estimated repair effort, and whether the repair makes sense compared to replacing the wing.
In some cases repairs are straightforward. In others, the pilot may decide that replacement is the better option. The final decision always remains with the owner.
The Goal of a Professional Inspection
A professional inspection is not only about determining whether a wing passes or fails. It is about giving pilots clear information about the condition of their equipment and the options available to keep it flying safely.
What We Check — In Depth
Below is a detailed explanation of each inspection component, written to help pilots understand exactly what we do and why it matters.